Peach Raspberry Crumble Bars
Buttery oat crumble, a juicy peach-raspberry middle, and edges that bake up deeply golden and crisp are what make these bars disappear fast. They slice cleanly once cooled, but the…
By Ava
•
•
Reading time: 9 min
Tip: save now, make later.
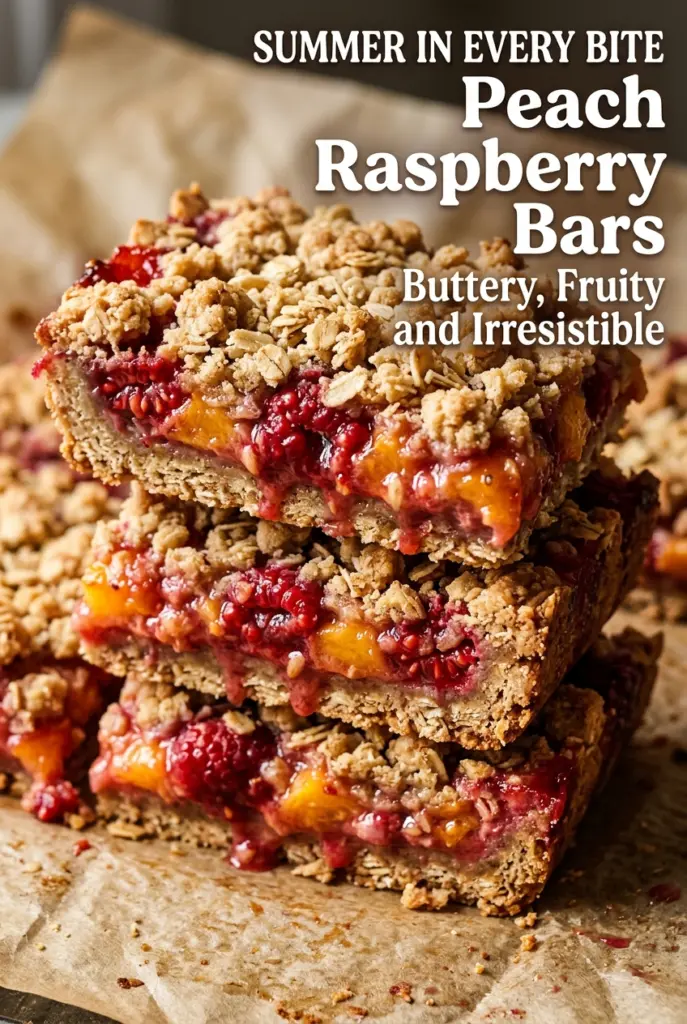
Buttery oat crumble, a juicy peach-raspberry middle, and edges that bake up deeply golden and crisp are what make these bars disappear fast. They slice cleanly once cooled, but the real magic is the contrast: tender fruit underneath, nubbly crumble on top, and just enough lemon to keep the filling bright instead of jammy-sweet.
The trick here is using melted butter in the crumb mixture so it packs well for the base, then breaks into irregular clumps on top. Cornstarch does the heavy lifting in the filling, giving the fruit enough structure to hold its shape without turning the bars loose and soupy. Raspberries bring sharpness, peaches bring body, and the two together bake into a filling that tastes more complex than either fruit does alone.
Below you’ll find the little details that keep the crust from getting sandy and the fruit layer from flooding the pan. If you’ve ever had crumble bars fall apart or come out gummy in the center, the process section will help you avoid both problems.
The filling set up beautifully and the bottom crust stayed crisp even after chilling overnight. The raspberries kept it from being too sweet, and the bars cut into neat squares once they were fully cool.
Love these peach raspberry crumble bars? Save them to Pinterest for the days when you want a buttery fruit dessert with a crisp oat topping and clean slices.
The Mistake That Makes Crumble Bars Turn Soft Instead of Crisp
The bottom layer only works if the oat mixture is pressed firmly enough to behave like a crust, not a loose pile of streusel. If you leave it crumbly, the fruit juices seep straight through and the base bakes up damp. A parchment-lined pan also matters here because it lets you lift the bars out for clean slicing instead of digging them out in pieces.
The other place these bars go wrong is the fruit layer. Too much filling, or filling that hasn’t been thickened, turns into a slippery layer that won’t set. Cornstarch needs the heat of the oven to do its job, so the bars need to bake until the center looks bubbled and the topping is a deep golden brown.
What Each Ingredient Is Actually Doing in These Bars
- Old-fashioned oats — These give the topping its chewy, nubby texture. Quick oats break down too much and make the crust pasty, so stick with rolled oats if you want those crisp edges and defined crumbs.
- All-purpose flour — This holds the crumble together and gives the base enough structure to slice. If you use a 1:1 gluten-free baking blend, choose one that includes xanthan gum so the bars don’t fall apart when cut.
- Brown sugar — Brown sugar adds moisture and a deeper caramel note that suits the fruit. White sugar will work in a pinch, but the crumble tastes flatter and less rich.
- Butter — Melted unsalted butter coats the dry ingredients evenly and helps the crumbs clump. Salted butter can be used if that’s what you have, but cut the added salt back a little so the bars don’t taste sharp.
- Peaches — Fresh ripe peaches give the filling body and fragrance. If yours are very juicy, dice them a little smaller and expect a slightly softer center; frozen peaches can work too, but thaw and drain them first so the filling doesn’t get watery.
- Raspberries — These bring acidity and keep the filling from tasting one-note sweet. Frozen raspberries are fine here, and there is no need to thaw them first.
- Cornstarch — This is the thickener that keeps the fruit layer sliceable. Arrowroot can stand in, but the filling may look glossier and set a little more softly.
- Lemon juice and vanilla — Lemon wakes up the peaches, and vanilla rounds out the tartness. Skip either one and the fruit tastes less complete.
Building the Crust, Layering the Fruit, and Baking Until Set
Mixing the Crumble
Stir the oats, flour, brown sugar, cinnamon, and salt together first, then pour in the melted butter and mix until every dry patch is moistened. The texture should look like damp sand with some larger clumps. If it looks greasy or paste-like, the butter was too hot or the mixture was overworked, and the bars will bake up dense instead of crumbly.
Pressing the Base
Take about two-thirds of the mixture and press it firmly into the parchment-lined pan. Use the bottom of a measuring cup to compact it into an even layer, especially in the corners where loose crumbs tend to hide. A firmly packed base is what keeps the bars from collapsing when you lift them out later.
Coating the Fruit
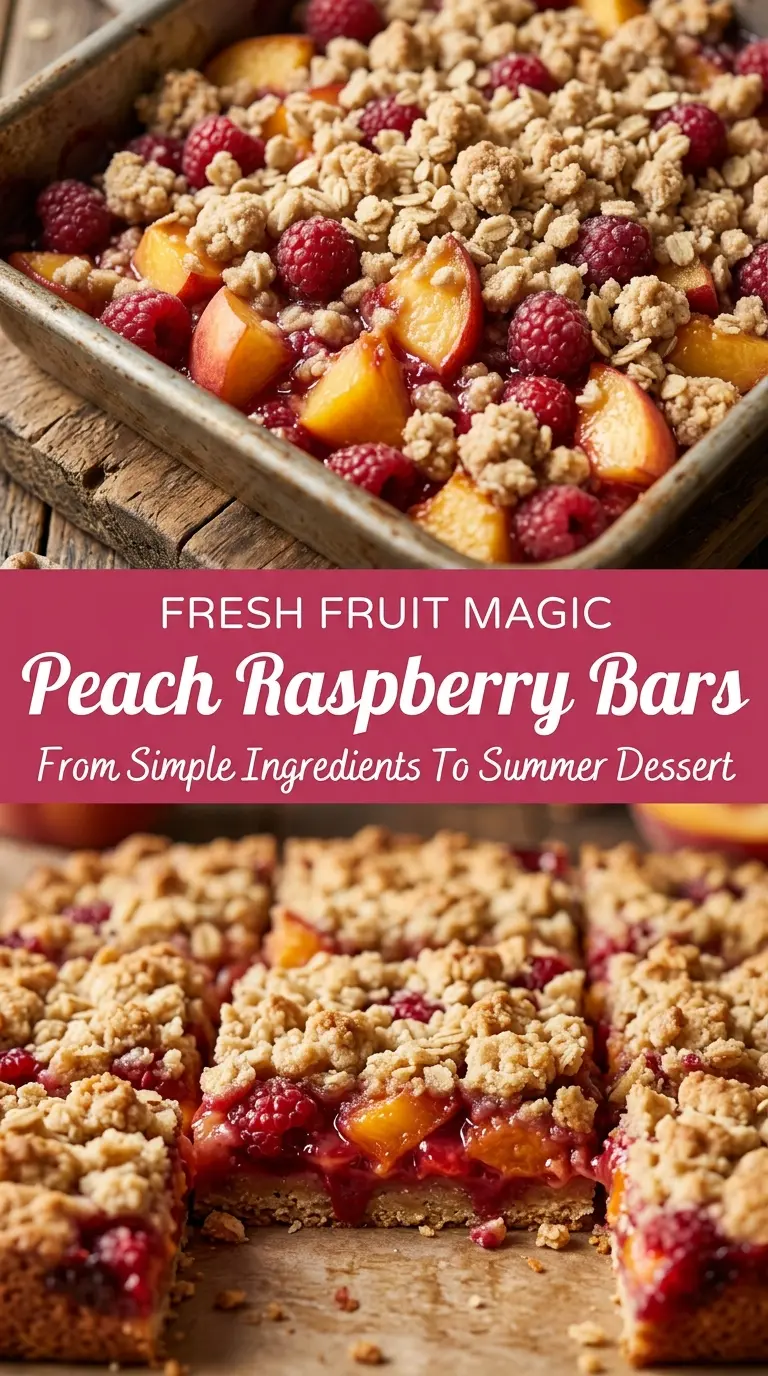
Stir the peaches, raspberries, sugar, cornstarch, lemon juice, and vanilla together just until the fruit is evenly coated. Don’t let it sit around too long before baking, or the sugar will start drawing out liquid and leave you with a wet filling in the bowl. Spread it over the crust in an even layer so the bars bake uniformly from edge to center.
Finishing the Bake
Scatter the remaining crumble over the fruit without pressing it down. Bake until the top is deeply golden and you can see bubbling around the edges and in the center; that bubbling tells you the cornstarch has activated. If the top looks done but the filling isn’t bubbling yet, the center will stay loose after cooling.
Make Them Gluten-Free Without Losing the Crumble
Swap the flour for a good 1:1 gluten-free baking blend and keep the oats certified gluten-free. The texture stays close to the original, though the bars may be a little more delicate when warm, so let them cool completely before slicing.
Lean Into Other Stone Fruit
Replace some or all of the peaches with nectarines, plums, or apricots. Softer fruits release more juice, so keep the cornstarch in place and bake until the center is actively bubbling.
Use Frozen Fruit When Fresh Peaches Aren’t Good
Frozen peaches and raspberries both work, but thaw and drain the peaches first if they’re packed in a lot of liquid. Frozen fruit usually needs the full bake time, and the filling may need an extra few minutes before the center bubbles through.
Storage and Reheating
- Refrigerator: Store covered for up to 4 days. The crumble softens a little in the fridge, but the flavor holds well.
- Freezer: These bars freeze well. Wrap individual squares tightly and freeze for up to 2 months, then thaw in the refrigerator overnight.
- Reheating: Warm a bar in a 300°F oven for about 8 minutes if you want the topping crisp again. The microwave softens the crumble, so use it only if texture doesn’t matter.
Questions I Get Asked About This Recipe

Peach Raspberry Crumble Bars
Ingredients
Equipment
Method
- Preheat oven to 350°F (175°C). This brings the oven to temperature so the bars bake evenly as soon as you place them inside.
- Line a 9×13-inch baking pan with parchment paper. Leave an overhang so you can lift the baked bars out for cleaner slicing.
- Mix oats, flour, brown sugar, cinnamon, salt, and melted butter until clumps form. The crumble should look sandy but hold together when pressed.
- Press two-thirds of the mixture into the prepared pan. Press firmly into an even layer so the base stays sturdy after baking.
- Combine peaches, raspberries, sugar, cornstarch, lemon juice, and vanilla in a bowl. Stir until the cornstarch is evenly distributed and no dry pockets remain.
- Spread the fruit mixture over the crust in an even layer. Make sure the filling reaches the edges for consistent bake-through.
- Sprinkle the remaining crumble mixture on top. Leave some fruit peeking through to help the top crisp as it bakes.
- Bake for 40–45 minutes until golden brown. The center should look set and the crumble should smell toasted.
- Cool completely before slicing into bars. Letting them cool firms up the fruit filling for neat bars that don’t spill.
- Serve the peach raspberry crumble bars. Slice with the parchment overhang for easy lifting and cleaner edges.