Halloween Graveyard Dirt Cups
Halloween Graveyard Dirt Cups are a fun and spooky treat that's perfect for celebrating this haunting season! These little cups usually have layers of creamy pudding and crushed chocolate cookies…
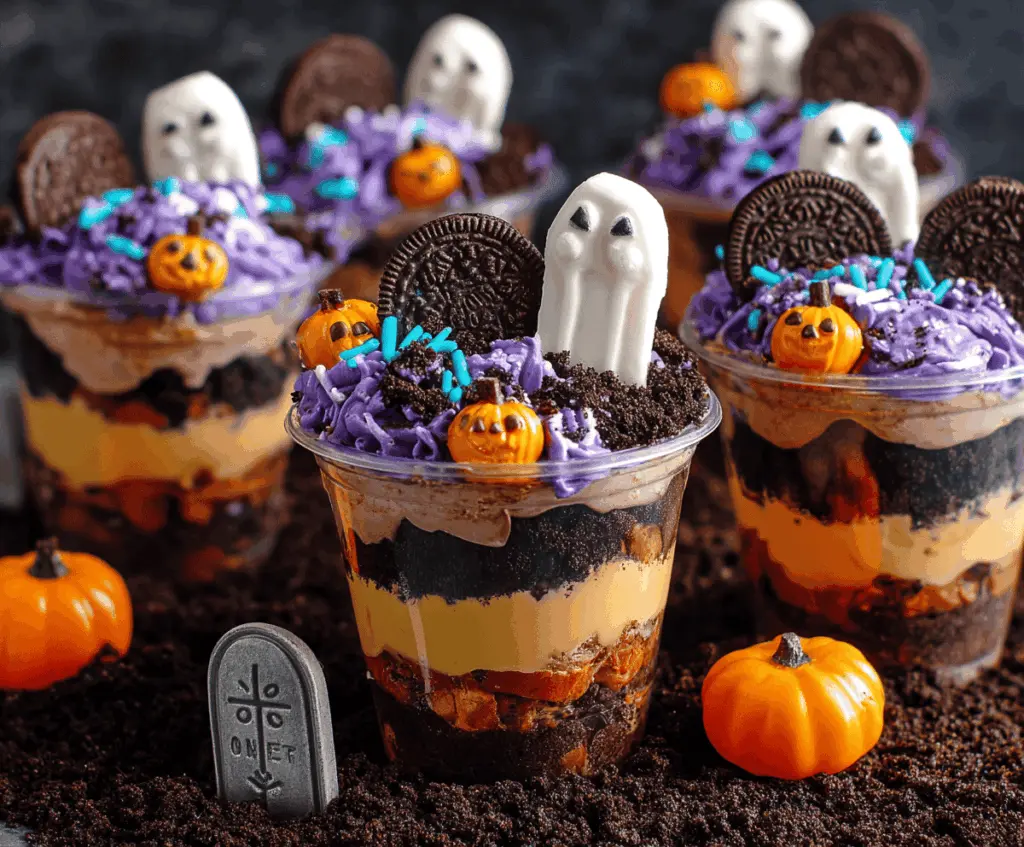
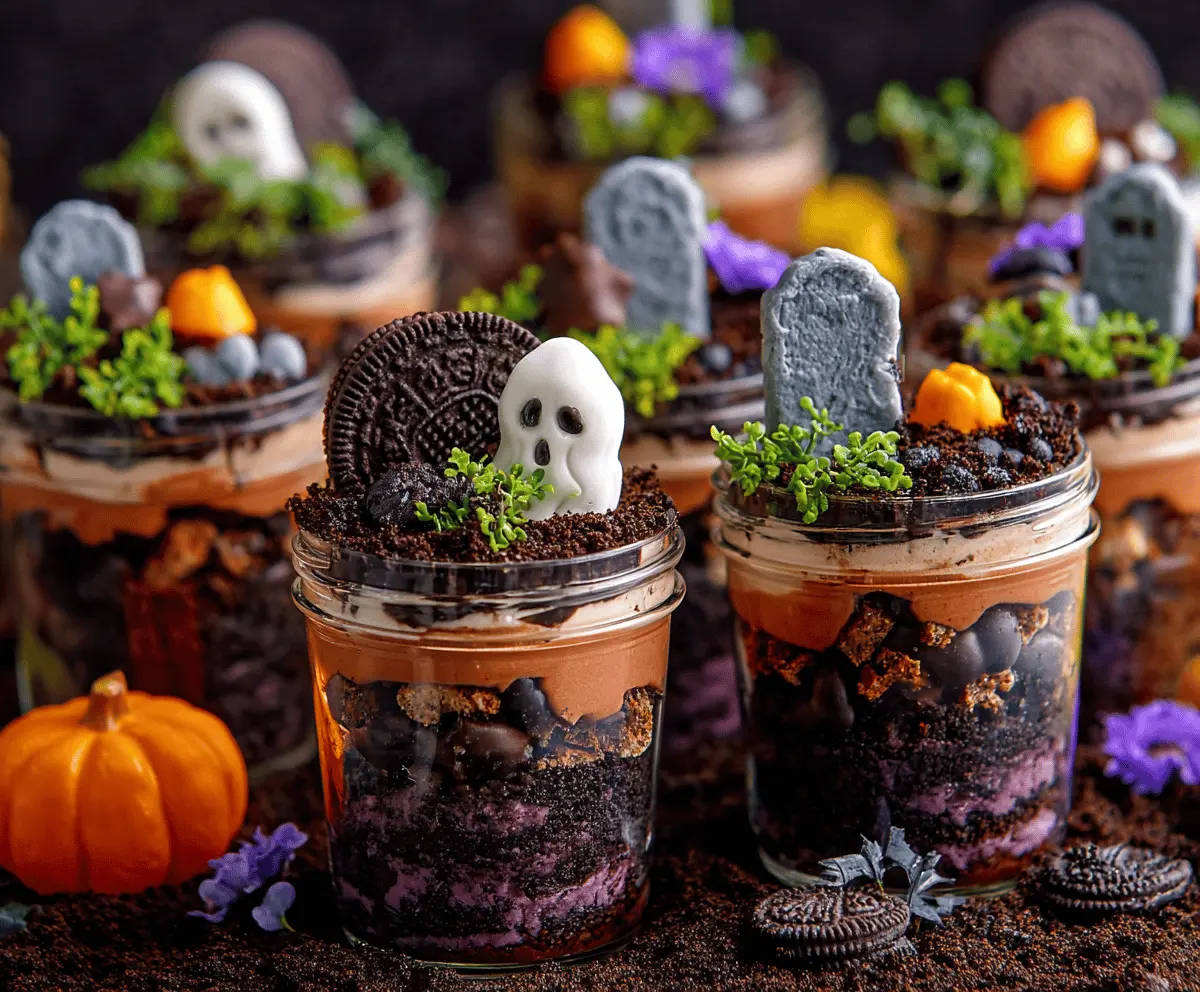
Halloween Graveyard Dirt Cups are a fun and spooky treat that’s perfect for celebrating this haunting season! These little cups usually have layers of creamy pudding and crushed chocolate cookies that look just like dirt, and they’re topped with gummy worms, candy bones, or even little tombstone-shaped cookies. They’re as tasty as they are creepy, making them a big hit at any Halloween party or family get-together.
I love making these because they’re so simple and everyone gets excited when they see the little “graveyard” set up in their dessert cup. I usually let kids help with adding the gummy worms and candies on top—that way, everyone can make their own creepy creation. Plus, it’s a great way to get a quick Halloween dessert on the table that’s sweet and playful.
One of my favorite ways to enjoy these Dirt Cups is to serve them chilled with a glass of cold milk. They’re a nice mix of crunchy and creamy, and the fun decorations make Halloween feel extra special. If you’re looking to add a little spooky touch without too much effort, these are perfect. I guarantee they’ll disappear fast and bring lots of smiles!
Key Ingredients & Substitutions
Chocolate Sandwich Cookies: These create the “dirt” base with their dark color and crumbly texture. Oreos are classic, but you can swap with any chocolate cookie or gluten-free cookies if needed.
Pudding Mix: Chocolate and vanilla pudding mixes form the creamy layers. Instant pudding is quick and easy, but you can use homemade pudding if you prefer. For dairy-free options, try coconut or almond milk-based puddings.
Caramel Candies: Adding diced caramel-filled candies adds a sweet surprise and texture. Rolos work great here, but if you want to skip caramel, chopped chocolate chips make a nice substitute.
Purple Whipped Cream: Food coloring makes the whipped cream festive. For a natural option, try a few drops of beet juice concentrate or purple sweet potato powder instead of artificial coloring.
Halloween Candy Decorations: Gummy ghosts, mini pumpkins, and cookies add spooky charm. Feel free to get creative—marshmallows, candy eyes, or edible glitter can personalize your graveyard.
How Can I Layer the Cups So They Look Good and Stay Stable?
Layering these dirt cups is key to getting the “graveyard” look and ensuring each bite has a balance of flavors. Follow these tips:
- Start by firmly pressing cookie crumbs in the bottom to create a solid base.
- Add the chocolate pudding mixed with caramel candies next, but don’t overfill—leave room to layer more crumbs on top.
- Then add another layer of cookie crumbs to separate the chocolate and vanilla puddings visually.
- Next comes the vanilla pudding layer—a nice contrast in color and flavor.
- Add one more thin layer of cookie crumbs on top for “dirt” texture.
- Finish with piped or spooned purple whipped cream. Use a piping bag for neat swirls.
- Decorate immediately after topping to help items stick well before chilling.
Chilling the cups for at least an hour before serving lets the layers set and flavors meld without turning soggy. If assembling ahead, wait to add toppings on the day you serve to keep the decorations fresh and bright.
Equipment You’ll Need
- Food processor – makes crushing the cookies into fine “dirt” crumbs quick and easy.
- Mixing bowls – you’ll need a few to prepare the chocolate pudding, vanilla pudding, and whipped cream separately.
- Whisk – helps mix the instant pudding smoothly without lumps.
- Electric mixer or hand mixer – whips the heavy cream into fluffy colored whipped cream fast.
- Piping bag or plastic sandwich bag – great for neatly adding the purple whipped cream on top.
- Clear plastic cups or small glass jars – lets you see the layered “graveyard” effect clearly.
Flavor Variations & Add-Ins
- Swap caramel candies for gummy worms for a classic creepy-crawly surprise inside the layers.
- Use butterscotch pudding instead of vanilla for a richer, sweeter flavor twist.
- Add crushed peppermint candies on top for a cool minty touch that contrasts the chocolate.
- Mix in chopped toasted nuts like pecans or walnuts for a crunchy texture against the soft pudding.
Halloween Graveyard Dirt Cups
Ingredients You’ll Need:
For The Dirt and Pudding Layers:
- 2 packs (14.3 oz each) chocolate sandwich cookies (like Oreos)
- 1 package (3.4 oz) instant chocolate pudding mix
- 2 cups cold milk (for chocolate pudding)
- 1 package (3.4 oz) instant vanilla pudding mix
- 2 cups cold milk (for vanilla pudding)
- 1 cup diced caramel-filled candy (e.g. Rolos or caramel bits)
For The Whipped Cream and Decorations:
- Purple food coloring
- 1 cup heavy whipping cream
- 2 tbsp powdered sugar
- Halloween-themed candy decorations:
- Gummy ghosts or marshmallow ghosts with black icing eyes
- Mini pumpkin candies
- Whole chocolate sandwich cookies (for tombstones)
- Blue and black jimmies or sprinkles for accents
How Much Time Will You Need?
This recipe requires about 20 minutes for preparation. Then, allow at least 1 hour for chilling so the layers set and flavors combine beautifully. Decorating can be quick and fun, especially with kids helping out!
Step-by-Step Instructions:
1. Prepare the “Dirt” Base:
Put the chocolate sandwich cookies into a food processor and pulse until finely crushed like dirt. Set aside about 1 ½ cups of these crumbs separately for garnishing the tops later.
2. Make the Chocolate & Vanilla Puddings:
In one bowl, whisk together the chocolate pudding mix and 2 cups of cold milk until thick. In another bowl, do the same with the vanilla pudding mix and 2 cups cold milk. Refrigerate both until ready to use.
3. Add Caramel Candy to Chocolate Pudding:
Dice your caramel-filled candies into small pieces and gently stir them into the chocolate pudding, giving it a nice chewy texture.
4. Whip the Purple Cream:
In a chilled bowl, beat the heavy cream with powdered sugar until soft peaks form. Add a few drops of purple food coloring and gently whip a bit more till it’s a pretty purple shade. Be careful to avoid overwhipping.
5. Assemble Your Graveyard Cups:
- Layer cookie crumbs at the bottom of clear cups to create the soil base.
- Top with the chocolate pudding mixed with caramel pieces.
- Add another layer of cookie crumbs.
- Spoon the vanilla pudding on top.
- Sprinkle a final thin layer of cookie crumbs.
- Pipe or spoon the purple whipped cream over the crumbs as the “grass.”
6. Decorate Your Graveyard:
Stick a whole chocolate cookie upright in the whipped cream to resemble a tombstone, place your gummy or marshmallow ghost beside it, scatter mini pumpkins around, and sprinkle with blue and black jimmies for extra spooky fun.
7. Chill and Serve:
Put the completed cups in the fridge and chill for at least one hour to let everything set perfectly. Serve chilled, and enjoy your festive, delicious Halloween treat!
Can I Use Gluten-Free Cookies for This Recipe?
Yes! Just substitute the chocolate sandwich cookies with your favorite gluten-free chocolate cookies. The texture might vary slightly, but it will still be delicious and maintain the dirt cup look.
How Far Ahead Can I Make These Dirt Cups?
You can assemble the cups up to a day in advance. Keep them covered in the refrigerator and add the whipped cream and decorations right before serving for the freshest look and best texture.
Can I Use Homemade Pudding Instead of Instant Mix?
Absolutely! Homemade pudding works great. Just ensure it’s thick and chilled before layering so the cups hold their shape well.
What’s the Best Way to Store Leftovers?
Store leftover cups in airtight containers in the fridge for up to 3 days. The cookie crumbs may soften over time, but the flavors will stay tasty. Give them a gentle stir before serving if needed.