
Homemade Reese’s Peanut Butter Cups
Homemade Reese's Peanut Butter Cups are a delicious treat that brings together creamy peanut butter and smooth chocolate in one perfect bite. These little cups are made with rich chocolate…
By Ava
•
•
Reading time: 6 min
Tip: save now, make later.
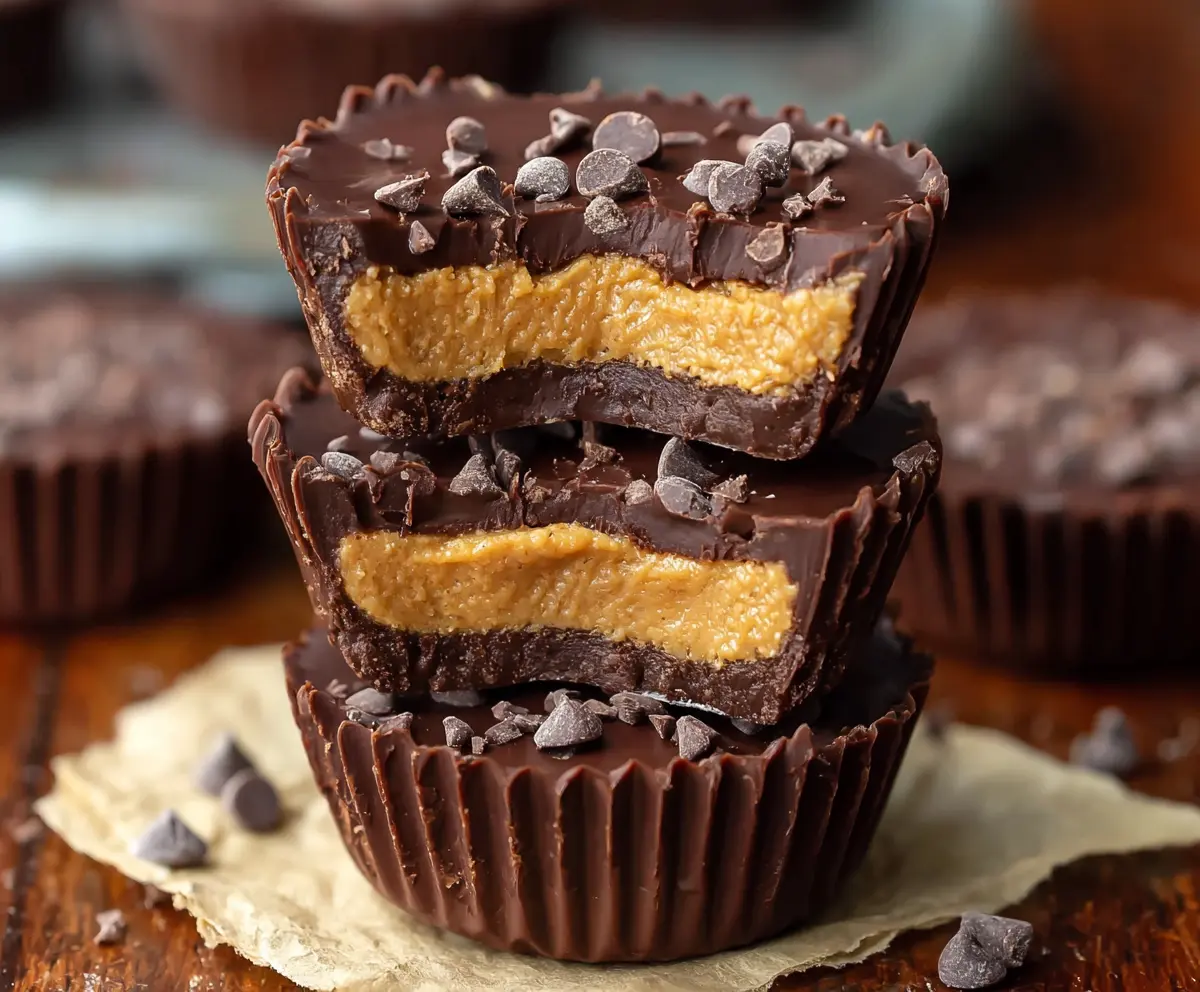
Homemade Reese’s Peanut Butter Cups are a delicious treat that brings together creamy peanut butter and smooth chocolate in one perfect bite. These little cups are made with rich chocolate on the outside and a sweet, salty peanut butter filling inside. If you love the classic candy, making them at home feels extra special and super satisfying.
I love making these cups because I can tweak the peanut butter filling just how I like it – not too sweet and just the right amount of saltiness to balance the chocolate. Plus, it’s a fun recipe to share with friends or kids, and it only takes a few simple ingredients. I find that chilling them well makes the chocolate snap just right, which is such a nice surprise when you bite in.
One of my favorite ways to enjoy homemade Reese’s peanut butter cups is with a cold glass of milk or as a little pick-me-up during a busy afternoon. They taste even better when you know you made them yourself! If you’ve ever wanted to try candy-making at home, this is a warm and easy way to start.
Key Ingredients & Substitutions
Chocolate Chips: Semisweet or dark chocolate chips give this recipe its rich chocolate flavor and firm texture. If you want a sweeter treat, milk chocolate works, and for dairy-free, use vegan chocolate chips.
Peanut Butter: Creamy peanut butter creates the smooth filling. Natural peanut butter is great for a less sweet taste, but regular creamy peanut butter works well. You can swap almond butter for a fun twist, though texture may change.
Powdered Sugar: This sweetens and thickens the peanut butter filling. If you’re cutting back on sugar, try a sugar substitute made for baking, but results may vary slightly in texture.
Butter: Softened unsalted butter helps bind the filling and makes it creamy. You can use salted butter but reduce or skip added salt in the filling.
Flaky Sea Salt & Mini Chocolate Chips: These are optional toppings. Sea salt adds a nice contrast to the sweet chocolate, and mini chips give a little crunch and extra chocolate flavor.
How Do You Make Sure the Chocolate Layers Set Firmly and Smoothly?
Creating a strong chocolate shell means your cups hold together and have that satisfying snap. Here’s how I do it:
- Use good quality chocolate chips or melting wafers—they melt smoothly and set nicely.
- When melting, microwave in short bursts (30 seconds), stirring often. This prevents burning.
- Spread the melted chocolate evenly at the bottom and just a bit up the sides. This forms a solid base and shell.
- Freeze the chocolate layer before adding the filling to make sure it’s completely set and won’t mix.
- Once your filling is in, cover it fully with melted chocolate, reaching all edges to seal in the peanut butter.
- Chill again until the entire cup is firm.
Taking these steps ensures your peanut butter cups keep their shape, have smooth chocolate, and are easy to remove from the liners.
Equipment You’ll Need
- Muffin tin – helps hold the paper liners in place and shapes the cups evenly.
- Paper cupcake liners – makes it easy to remove the peanut butter cups and keeps them neat.
- Microwave-safe bowl – for melting chocolate safely and easily.
- Spoon or small spatula – perfect for spreading melted chocolate and filling the cups.
- Mixing bowl – to combine your peanut butter filling ingredients smoothly.
Flavor Variations & Add-Ins
- Swap peanut butter for almond or cashew butter for a nutty twist that’s just as creamy.
- Add a pinch of cinnamon or chili powder to the filling for a warm or spicy surprise.
- Stir in crushed graham crackers or rice cereal for extra crunch and texture.
- Use white chocolate or milk chocolate instead of dark for a sweeter, milder flavor.
How to Make Homemade Reese’s Peanut Butter Cups
Ingredients You’ll Need:
For the Chocolate:
- 1 1/2 cups semisweet or dark chocolate chips (or chocolate melting wafers)
For the Peanut Butter Filling:
- 1 cup creamy peanut butter (natural or regular, unsalted or salted)
- 1/4 cup unsalted butter, softened
- 1 cup powdered sugar, sifted
- 1/4 teaspoon salt (omit if using salted peanut butter)
For Garnish (Optional):
- Flaky sea salt
- Mini chocolate chips
- Paper cupcake liners
How Much Time Will You Need?
This recipe takes about 15 minutes to prepare and melt the chocolate, plus 30-45 minutes total chilling time to let each chocolate layer set properly. The total time is roughly 1 hour from start to finish, including chilling.
Step-by-Step Instructions:
1. Prepare the Chocolate Shell:
Line a muffin tin with paper cupcake liners. In a microwave-safe bowl, melt 1 cup of chocolate chips by heating for 30 seconds at a time, stirring in between until smooth and fully melted. Spoon about 1 tablespoon of melted chocolate into each liner. Spread the chocolate evenly along the bottom and a little up the sides using the back of a spoon to form a shell. Place the pan in the freezer for about 10-15 minutes until firm.
2. Make the Peanut Butter Filling:
While the chocolate chills, mix the peanut butter, softened butter, powdered sugar, and salt together in a bowl until smooth and creamy. Avoid overmixing to keep the texture just right.
3. Assemble the Cups:
Take the muffin tin out of the freezer. Add about 1 tablespoon of the peanut butter filling into each chocolate shell, gently pressing it down but not flattening it completely. Melt the remaining 1/2 cup of chocolate chips as before. Pour the melted chocolate over the peanut butter filling, covering it fully and reaching the edges to seal the cups. While the chocolate is still soft, sprinkle mini chocolate chips and a pinch of flaky sea salt on top for extra flavor and decoration.
4. Chill and Serve:
Put the muffin tin back into the freezer for 20-30 minutes, or until the cups are solid and firm. After they set, remove from the tin and peel off the liners. Store your peanut butter cups in an airtight container in the fridge for up to 2 weeks or freeze them to enjoy later. Serve chilled or at room temperature for a delicious treat!
Can I Use Natural Peanut Butter in This Recipe?
Yes! Natural peanut butter works well, but since it’s often thinner, make sure to mix the filling thoroughly so it holds together. You may also want to chill the filling a bit before assembling to make it easier to handle.
How Should I Store Homemade Peanut Butter Cups?
Store them in an airtight container in the refrigerator for up to 2 weeks. If you want to keep them longer, freeze them for up to 3 months. Just thaw briefly at room temperature before enjoying.
Can I Substitute Almond Butter for Peanut Butter?
Absolutely! Almond butter or other nut butters make a tasty alternative. Keep in mind the flavor and texture might be a bit different, but the process and measurements stay the same.
Is It Possible to Make These Without a Microwave?
Yes, you can melt the chocolate on the stove using a double boiler or a heatproof bowl over simmering water. Stir constantly until melted and smooth, then follow the recipe as usual.